Table of Contents Previous Screen Previous Chapter
Select the application procedure, log in as a user, and apply.
Note: To log in as a user, first register as a user. (For details, please refer to 5.2.1 Register User Information.)
The following information is provided in accordance with the procedures.
1.
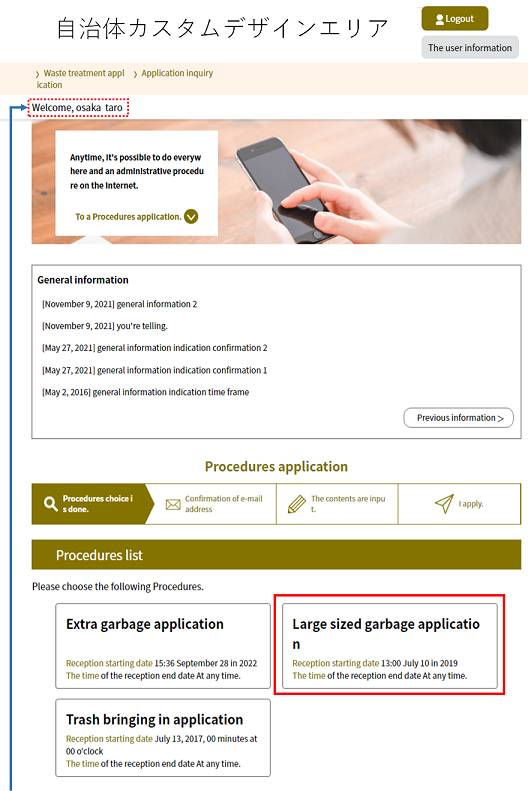
Click [Name of Procedure] from the «List of Procedures Screen».
The «User Login Screen» will be displayed to confirm your login to the service.
If you are already logged in, the «Procedures Explanation Screen» will be displayed, so please proceed to Step 5.
|
|
| When logged in, the registered user name will be displayed. |
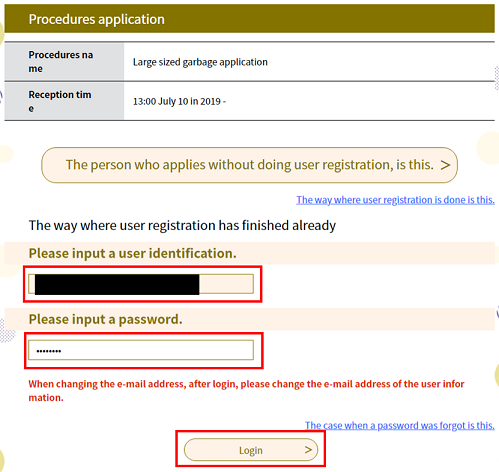
2. Enter your [User ID (e-mail address)] and [Password].
|
User ID (E-mail address) |
Enter your User ID (e-mail address). For those who have registered online, the User ID will be the registered e-mail address. |
|
Password |
Enter the password. For security reasons, the password will be indicated as dots. Note: Input restrictions may vary according to system-side settings. |
 |
|
MEMO:
● If you have not registered as a user of this service and want to register as a user now, please click [To Register as a User] and proceed to 5.2.1 Register User Information/Step 2.
● If you forgot your password, you can click [Forgot Your Password?] to reset your password according to the instructions in 5.2.2 Reset Password/Step 3 onward.
● To change your contact e-mail address, immediately log in and following the instructions in 5.3.1 Change E-mail Address.
3.
Click Log In .
The «Guidance Screen for Changing Password» will be displayed.
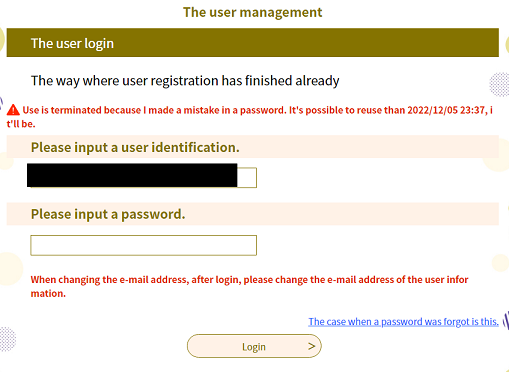
Note: If the password is entered incorrectly a specified number of times, use will be suspended.
 |
|
MEMO:
● If use is suspended, follow the instructions in 5.2.2 Reset Password to cancel the suspension.
4.
Click Log In without Changing Password.
The «Procedures Explanation Screen» will be displayed.
Note: To change a password, click Change Password and proceed to 5.3.2 Change Password/Step 3].
 |
|
Note: A file for download may be attached depending on the procedure.
Please download the attachment to your PC, since it will be a notification of details about an application or a document that needs to be submitted.
(For steps, refer to 1.1.1 Application (without Login)/MEMO: About file downloads).
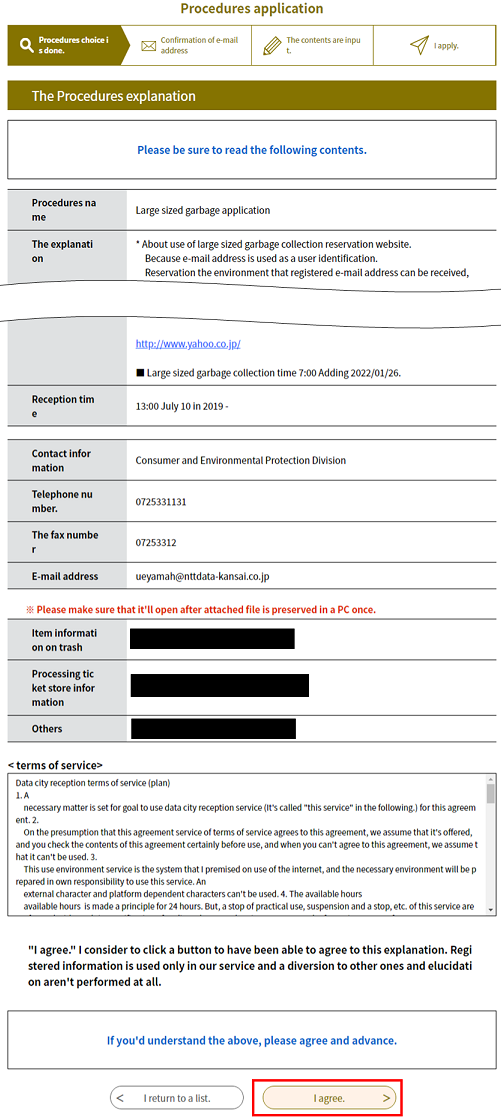
<Checking Notes>
If “Notes” appears on the «Procedures Explanation Screen», you must check the box to the left of "I have confirmed.”
You cannot proceed to the next screen without first checking the box.
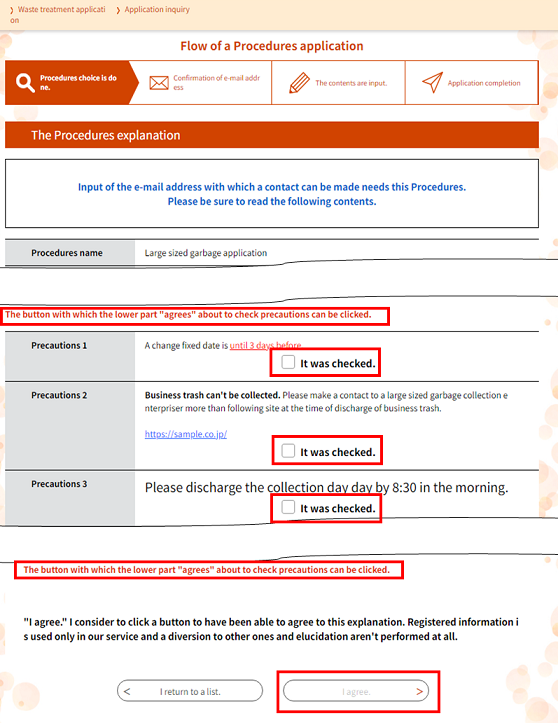
6.
Click Agree .
The «Application Screen» will be displayed.
The registered user information will be displayed, so enter the required items and click Proceed to Confirm .
Note: The required items for input will differ according to the procedure. Please input the information according to the required procedure.
Note: If you are unable to click [Agree], confirm and scroll through the Terms of Use until the end. Once you have reached the end, [Agree] will become clickable.
Note: Some procedures may require you to set up an attachment such as an item list in «Application Screen». Please ensure that the information is complete and accurate before setting up the file attachment.
(For steps, refer to 1.1.1 Application (without Login)/MEMO: Settings for attached files).
Note: When the message “There is no past collection data with the same address, name (kana), and telephone number” is displayed, please apply by telephone.
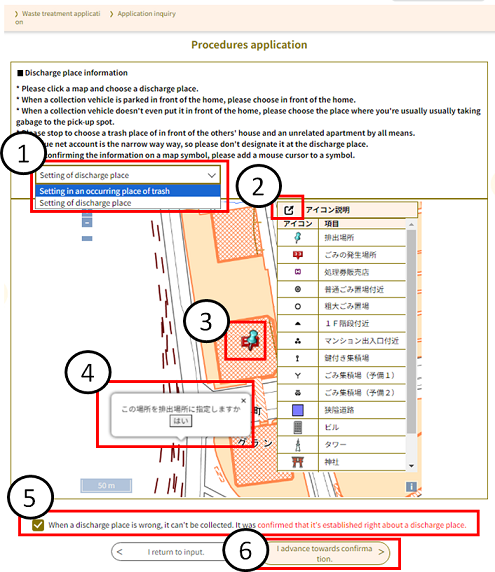
● If a map is shown after going to the next screen, you must set your garbage and collection point locations.
Please see the steps as detailed below.
|
① |
● Click on the map with “Set garbage location” selected to change your garbage and collection point locations.
|
|
|
② |
Click to close the descriptions of the icons shown on the map. |
|
| ③ |
|
This pin indicates the collection point. |
|
|
This pin indicates the garbage location. |
|
|
④ |
Click on the map and a pop-up will appear to confirm that you want to finalize the changes.
|
|
|
⑤ |
You may need to check that there are no errors in where the “collection point” and “garbage location” pins are located.
|
|
|
⑥ |
Once you have completed the settings, click "Proceed to confirmation”. You will be taken to the «Application Content Confirmation» screen. |
|


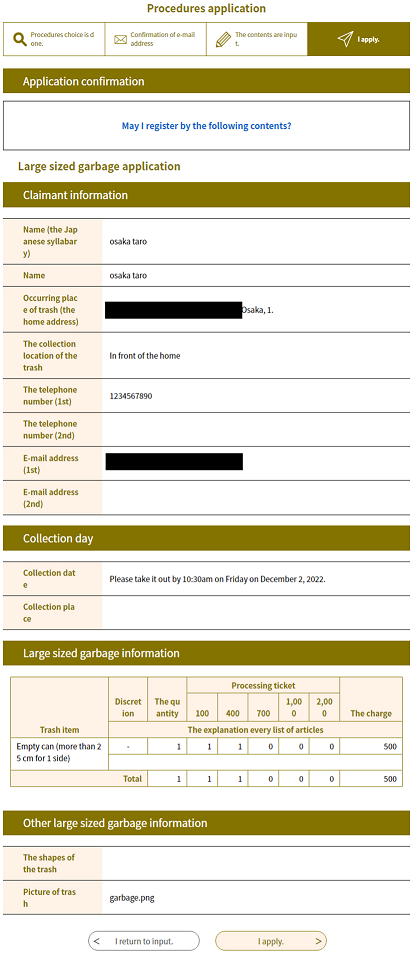
7. The «Application Confirmation Screen» will be displayed. Please check the content and click Apply .
 |
|
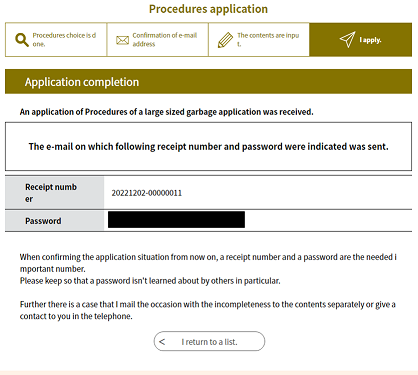
8. An [Application Number] and [Password] will be issued before the application procedure will complete.
Note: The [Application Number] and [Password] are required for authentication when performing an [Application Content Inquiry].
(For details, refer to 2.1.1 Application Inquiry Authentication.)
Note: This information is important, so it is recommended that you keep a copy of it, such as a screen shot.
 |
|
9.
For completing a procedure that requires entering an e-mail address, the user will receive an e-mail with the [Application Number] and [Password].
Note: Confirm the content of the e-mail and keep the message in a safe place.
 |
|